Are you tired of the same old hot coffee on those scorching summer days? Wish there was a quick, easy way to get your caffeine fix without feeling like you’re sipping on a cup of sunshine? You’re not alone.
Many coffee lovers are searching for a refreshing twist to their daily ritual as temperatures climb. Here’s something interesting: cold brew isn’t the only option for a cooler caffeine kick.
Enter the AeroPress – a nifty tool that’s perfect for brewing delicious iced coffee fast. Unlike traditional cold brew methods that can take up to 24 hours, this recipe turns your hot coffee into icy refreshment in just minutes, capturing all the rich flavors without watering them down.
Our guide will walk you through making amazing iced coffee with an AeroPress step by step, transforming your sweltering summer days into chilled-out bliss. Get ready to chill out!
Key Takeaways
- The AeroPress is a unique coffee maker that brews smooth, rich coffee quickly using air pressure. It is worth investing in.. It is especially good for making iced coffee because it extracts flavors efficiently and allows you to flash-chill your brew over ice without losing taste.
- To make iced coffee with an AeroPress, prepare the press and rinse the filter with hot water. Then, grind 20g of coffee beans to a medium-fine consistency. Brew the coffee by pressing hot water through the grounds into a cup filled with large ice chunks, instantly cooling it down.
- You can enhance your iced AeroPress coffee by using two paper filters instead of one for a clearer drink and experimenting with different brewing times to find your ideal taste. Also, consider trying alternative recipes like Coffee Soda or Japanese Iced Coffee for variety.
What is an AeroPress, and Why is it Great for Making Iced Coffee?

An AeroPress is a unique coffee maker loved by coffee enthusiasts for its ability to brew smooth, rich coffee quickly. This handy device uses air pressure to push hot water through ground coffee, resulting in a cup that combines the best parts of espresso and French press without bitterness or grit.
The AeroPress shines for making iced coffee because it efficiently extracts delicious flavors from coffee grounds. Unlike traditional cold brew methods, which might miss out on sweetness and acidity due to lower brewing temperatures, an AeroPress allows you to brew hot and then instantly chill your coffee over ice.
This method keeps all the vibrant flavors intact.
The technique of pressing hot brewed coffee over large chunks of ice flash-chills it, locking in unique flavor profiles and lowering acidity—perfect for those with sensitive stomachs looking for a refreshing energy boost.
With recommended ratios involving precise amounts of coffee, ice, and water at specific temperatures, users get optimal taste without dilution. Furthermore, you can tweak your brewing process with extras like double paper filters for added clarity in your drink.
All these features make an AeroPress great and exceptional for crafting iced coffees that stand out in flavor and quality.
Iced AeroPress Recipe – Step-by-Step Instructions

Making iced coffee with an AeroPress is easy and fun. Follow these simple steps to enjoy a refreshing cup any time you want.
Preparing the AeroPress
Start by assembling your AeroPress. Make sure the rubber plunger is at the bottom of the number 4 circle. This will be your starting point for a perfect press. Place a paper filter in the AeroPress’s detachable plastic cap.
You want to make sure all coffee grounds stay inside during brewing.
Next, rinse the paper filter with hot water. This step removes any papery taste from the filter and warms up your brewer, helping keep your coffee hot. Ensure everything fits snugly together before moving on to grinding your coffee beans for a fresh and flavorful cup.
An AeroPress is a unique coffee maker loved by coffee enthusiasts for its ability to brew smooth, rich coffee quickly.
Weighing and Grinding Coffee
Once your AeroPress is ready, it’s time to focus on the coffee itself. Grab 20g of regular coffee beans for a smooth and flavorful base. Use a scale for accuracy – this makes sure your iced coffee turns out perfect every time.
Then, take those beans and grind them to a medium-fine consistency. This specific grind size works best with the AeroPress, letting you extract all the rich flavors without making the coffee bitter.
Next, check that your grinder settings are correct before starting. Proper grinding is crucial for achieving that lower acidity and less bitter taste we all love in an iced coffee.
Grinding your own beans also lets you control the freshness and quality of your brew, ensuring every sip is as delicious as intended by top baristas like James Hoffmann from Square Mile Coffee Roasters.
Brewing the Coffee
All these features make an AeroPress not just great but exceptional for crafting iced coffees that stand out in both flavor and quality.Heat your water to 210℉ (99℃). Pour it over the medium-fine grind coffee in the AeroPress.
This is where precision meets passion – aim for a total brewing time of between 5:00-8:00 minutes.
Next, give your coffee a good stir before placing two paper filters on top. This step helps ensure that every sip of your iced coffee will be perfectly clear and full of flavor. Then, press gently but firmly down on the plunger.
The goal here is to extract all the goodness from those grounds without rushing—patience pays off with every flavorful drop pressed over large chunks of ice, instantly chilling the brew without diluting its rich taste.
Stirring and Rinsing the Filter
After the coffee has started brewing, it’s time to focus on stirring and preparing the filter. Stir your coffee gently but quickly for about 10 seconds. This action helps mix the coffee grounds evenly with water, ensuring a uniform extraction.
It’s like making sure every sip of your iced AeroPress coffee is full of flavor.
Next up, get ready to rinse your filter. If you’re going for extra clarity in your cold brew coffee, use two paper filters instead of one. Place them in the cap and run cold water through them before attaching the cap to your AeroPress chamber.
Rinsing removes any papery taste and primes the filters for a cleaner brew. This tiny step makes a big difference in making that perfect cup of iced coffee.
Finally, after rinsing, securely attach the filter cap containing the pre-rinsed filters to your AeroPress setup. Now you’re all set for flipping and pressing which will ultimately give you that smooth and refreshing cup of iced AeroPress coffee we all love during those hot summer days or as an energizing treat anytime.
Flipping and Plunging
Once you’ve stirred the coffee and rinsed the filter, it’s time for the next exciting step: flipping and plunging. You’ll need to be quick and careful here. Securely hold the AeroPress over your server filled with big chunky ice.
Now flip the AeroPress in one smooth motion so it sits on top of your server or glass. This is where you put those flipping skills to use.
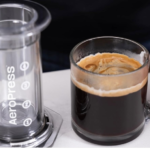
Now comes plunging. Press down firmly but steadily on the plunger. Your hot coffee will rush over the ice, cooling instantly while preserving its rich flavor – just what every coffee lover wants from an iced drink! Keep pressing until all coffee has flowed through, leaving behind a used coffee puck in your AeroPress.
Pour this freshly made iced coffee into a chilled glass ready for serving. Enjoy each sip of this refreshing drink that combines warmth and coolness in perfect balance.
Serving and Enjoying
After you’ve flipped and plunged the AeroPress, you’re ready for the best part: serving and enjoying your iced coffee. Pour the freshly brewed coffee over a glass filled with big chunky ice.
This step cools it down quickly, keeping its rich flavors intact. Add a milk alternative if you prefer a creamier taste.
For an extra twist, watch an AeroPress movie to see creative ways people enjoy their coffee around the world. Experiment with different additions like syrups or spices to make each cup unique.
Enjoy your iced AeroPress coffee on hot days, as a refreshing pick-me-up any time of day.
Alternative Recipes for Iced Coffee with an AeroPress
Explore fun twists on your iced coffee game with unique AeroPress recipes like Coffee Soda and Japanese Iced Coffee. Keep reading to find your new favorite method!
Homemade Coffee Soda
Making homemade coffee soda with your AeroPress is a fun twist on traditional iced coffee. First, use the AeroPress to brew a strong concentrate. This method pulls out the rich flavors of your coffee, making it the perfect base for your soda.
Then, add ice to a glass and pour the brewed concentrate over it.
Next, top off your glass with sparkling water for that refreshing fizz. Sweeten with simple syrup or sugar as desired and stir gently to mix everything together. The AeroPress proves itself again as an ideal tool for crafting this unique beverage right at home.
Get ready to enjoy something different with Japanese Iced Coffee next!
Japanese Iced Coffee
Japanese Iced Coffee is a thrilling way to chill your coffee quickly without losing its rich flavors. You start by brewing hot coffee directly over large ice chunks using the AeroPress, which acts perfectly for this method.
This technique flash chills the coffee, ensuring you get a cold drink instantly while preserving all the great taste notes. For this process, use a 1:15 ratio with 20g of coffee and 300g divided equally between water at 210℉ (99℃) and ice.
Firstly, set up your AeroPress for success by preparing it as usual. Then pour your hot water over medium/fine ground coffee inside it. Agitate the mixture briefly to ensure thorough extraction.
Here’s where you flip Aeropress, carefully positioning it over a server filled with ice before pressing down firmly. As soon as you’ve completed these steps, pour your freshly made Japanese Iced Coffee into a chilled glass and enjoy immediately.
This quick transition from hot to cold not only cools down the beverage rapidly but also locks in flavor that ordinary chilling methods might dilute.
AeroPress Flash Brew
The AeroPress Flash Brew is a game-changer for iced coffee lovers. You start with 20g of coffee and grind it to a medium/fine texture. Heat your water to 210℉ (99℃) and get ready with 150g of big chunky ice.
This method uses the AeroPress to first brew the coffee hot, which extracts complex flavors fast. Then, you instantly chill it by pressing over the ice, locking in those rich tastes without watering them down.
You’ll need two paper filters for this recipe to ensure your drink is crystal clear. Use a 1:1 ratio of water to ice (150g each) for the perfect chill that doesn’t dilute your coffee’s strength or flavor.
Adjust brewing time between 5:00-8:00 minutes depending on how strong you like it. Serve your flash-brewed coffee in a chilled glass for an invigorating experience every sip promises.
Tips for Upgrading Your Iced Coffee Experience with an AeroPress
Use two paper filters instead of one to make your iced coffee clearer and taste better. This small change catches more oils and fine grounds, giving your coffee a smoother flavor. Make sure to wet the filters before adding your coffee grounds for the best results.
Experiment with different brewing times to find your perfect cup. A longer brew can bring out deeper flavors, while a shorter time keeps it light and sweet. Play around within the recommended range, using 20g of coffee and adjusting between 1:15 minutes up to 2 minutes to see what suits your taste buds best.
Next, let’s dive into some frequently asked questions about making iced coffee with an AeroPress.
FAQs about Making Iced Coffee with an AeroPress
Got questions about making iced coffee with an AeroPress? You’re not alone. Many people wonder how much coffee to use, the right grind size, how long to steep the coffee, and if they can swap out paper filters for reusable ones.
Keep reading to get all your questions answered and master the art of iced coffee with AeroPress.
How much coffee do I use?
Use 20g of coffee for making your iced coffee with an AeroPress. This amount works well to create a balanced and flavorful cup. The recipe follows a 1:15 coffee-to-water ratio, which is ideal for extracting the perfect taste without making it too strong or weak.
Feel free to adjust how much you brew according to taste. If you like your coffee a bit stronger, add more grounds. For a lighter flavor, use less. Experimenting will help you find your perfect balance.
Next up, let’s talk about what grind size should I use?
What grind size should I use?
For your AeroPress iced coffee, pick a medium/fine grind size. This texture is crucial because it ensures the right extraction rate, letting all the rich flavors come through without making the coffee too bitter or sour.
Aim for consistency in your grind to get the best taste.
Stick closely to using 20g of coffee with this grind size to hit that perfect balance in your brew. Adjusting finer or coarser can change how your coffee tastes, so start here and tweak based on preference.
A precise grind leads to a delicious cup every time you press down on that AeroPress.
How long should I steep the coffee?
Steep your coffee in the AeroPress for about 1-2 minutes before plunging. This short time is perfect for extracting the rich flavors without bitterness. Feel free to adjust this time by a few seconds more or less, depending on how strong you like your coffee.
The recommended total brew time for iced coffee with an AeroPress is between 5:00 and 8:00 minutes. This includes the steeping and all other brewing stages. Experiment within this range to find what tastes best to you.
Brewing a bit longer can enhance the extraction, making your iced coffee even more delicious.
Can I use a reusable filter instead of paper filters?
Yes, you can use a reusable filter for making iced coffee with an AeroPress. The author suggests using two paper filters for clearer coffee. Yet, a reusable one works well too. It even lets you tweak the brew time to get your coffee just right.
Choosing a reusable filter means more flavor and less waste. You control how long or short to brew your coffee. This flexibility makes every cup of iced coffee unique to your taste.
Plus, it’s good for the planet since you’re not throwing away paper filters each time.
Conclusion
Making iced coffee with an AeroPress is quick and easy. You need your AeroPress, coffee, ice, and a few minutes. This method brings out the best in your coffee beans, giving you rich flavors fast.
Try different recipes like Coffee Soda or Japanese Iced Coffee for variety. With these steps, great iced coffee is within reach any summer day. Grab your AeroPress and start brewing today!
FAQs
1. What do I need to make iced coffee with an AeroPress?
You need an AeroPress, coffee grounds, ice, water, and a mug or glass.
2. How much coffee should I use for one serving of iced coffee?
Use two scoops of your favorite coffee grounds for one serving of iced coffee.
3. Can I use regular ice cubes for the iced coffee?
Yes, you can use regular ice cubes to make your iced coffee cold.
4. How long does it take to make iced coffee with an AeroPress?
It takes about two minutes to press the coffee through the AeroPress and then you just add ice.
5. Do I need to cool down the brewed coffee before adding ice?
No, you can add ice directly after brewing to cool it down instantly.